
Going Linux
The Podcast
Receive new episodes automatically.
Subscribe for free:

This work
is licensed under a
Creative Commons Attribution 3.0 License.
Going Linux
Practical Information for Using Linux To Get Things Done


Web-based e-mail programs that come from your internet service provider (ISP), and Internet mail systems like Hotmail, Yahoo Mail and Gmail are convenient to use because they allow you to read and send mail from any computer. The only thing you need to run these is a web browser. Many ISPs provide mail clients that you can use to read and respond to your e-mail off-line as well. Unfortunately those programs are usually applications for Windows. Many ISPs also give you the option of using their on-line mail in conjunction with almost any computer-based mail client that can handle POP mail or IMAP mail. Thunderbird is a cross-platform e-mail client that works on Linux and Mac as well as on Windows.
Here we'll describe step-by-step how to setup Thunderbird to receive and send your mail through Gmail. Google's website provides help for setting-up mail clients to work with Gmail. The instructions on the website are for Windows and Mac, however. Whether you are setting up Thunderbird in Linux, Window or Mac, the setup is similar. Similar, but not identical.
Before you get started, you will need to log-in to your Gmail account at mail.google.com and change the settings to enable POP mail. Here is a link to Google's instructions on how to do this. http://mail.google.com/support/bin/answer.py?answer=13273
Setting-up Thunderbird 1.5
- Open Thunderbird, and
select Edit,
Account Settings.
You can use Thunderbird to get your mail from more than one source, so if you have already setup one account, you'll see those settings listed here. - Click the Add Account button.
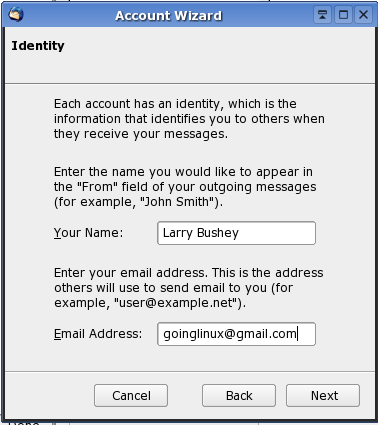
- Select the Email account radio button and click Next. The "Identity" screen appears.
- Enter your full name and
your Gmail email address in the appropriate fields, and click Next.
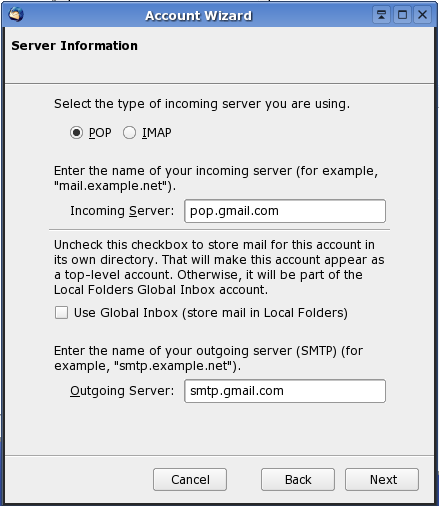
- Gmail uses POP for its incoming service, so choose POP rather than IMAP.
- Enter pop.gmail.com in the "Incoming Server" field.
- If you are setting up Thunderbird to retrieve mail from more than one e-mail system, you need to decide whether you want Thunderbird to put all of your e-mail into a single, universal in-box, or if you want separate inboxes for each system. If you want to keep your mail separate, remove the checkmark from Use Global Inbox.
- Set the "Outgoing
Server" to smtp.gmail.com,
and click Next.
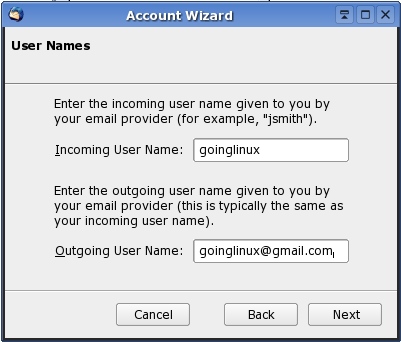
- Enter the incoming user name provided by your e-mail provider. This is usually the name you use to log-in to your mail account. For Gmail, it's the part of your e-mail address before the "@gmail.com."
- Enter your outgoing user
name (for Gmail, this is your full e-mail address) and click Next.
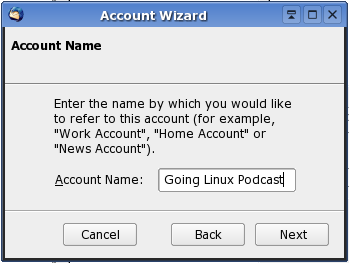
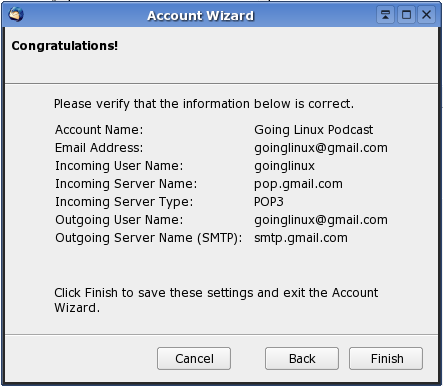
- Enter an account name.
This is the name
that will be used as a label for your account in Thunderbird and as a
label for your inbox.
- Click Finish and you are
almost done.
- In the list of settings below your new account name, select Server Settings.
- The default setting for incoming POP mail port is 110. Your e-mail provider will let you know if it uses the default port. Gmail uses port 995 instead. Make that change in the "Port" field.
- In the "Security Settings" section, select SSL from the "Use secure connection" options. Other e-mail providers may use different settings here.
- Gmail does not use
secure authentication, so ensure that the Use secure authentication
check box is not checked.

- Ensure that the Check for messages at startup and Automatically download new messages check boxes are checked.
- In the list of settings below your account settings, select Outgoing Server (SMTP).
- In the "Outgoing Server (SMTP) Settings" window, choose your smtp.gmail.com account and click the Edit button.
- The default outgoing SMTP port setting is 25. Gmail uses port 587 instead, so make that change in the "Port" field.
- The server name should already be entered as smtp.gmail.com.
- The "User Name" field should be your full e-mail address, including the "@gmail.com."
- Select TLS from the "Use
secure connection" radio buttons and click OK.

- Click OK to finish your setup.
Search
our audio
files
Search our site
Search our site
