10 Things To Do After Installing Linux Mint 17 LTS
Updated: 09-Jun-2014
At the Going Linux Podcast, we often receive emails asking the question, "What is the best Linux distribution for users switching to Linux?" We believe, as of the writing of this article, that Linux Mint is the easiest to use and the best Linux distribution to recommend to newbies.
eWeek (Jun, 3, 2014): "Linux Mint 17 With Cinnamon Desktop Keeps Focus on Ease of Use" Sean M. Kerner
Mint 17 was released in late May, 2014 as a LTS (Long Term Support) release. LTS means that it is supported with security patches and updates until 2019. With Linux, these include both operating system updates and updates for installed applications. LTS also means that in-place upgrades from Mint 17 to the next release will be very easy to accomplish until then. In the world of desktop operating systems, Ubuntu Linux is currently better known than Linux Mint, probably due the availability of Canonical's resources to produce better marketing. Linux Mint, on the other hand, has been described as “Ubuntu done right” because it pre-installs what most switchers and cross-platform users will want. That makes Linux Mint "just work" right out of the box for most people. Even so, it's the "for most people" that can cause problems. There are some things you should do right after installing Mint 17 to maximize your satisfaction with Mint. Some of these suggestions may save you some time looking them up elsewhere.
Do the 10 things listed below BEFORE you invest the time...
- ...installing your favorite applications
- ...copying your video collection to the home partition
- ...changing the theme to match the color blue on your keyboard's Fn keys
- ...or (for veteran users) tweaking your conky script to reflect the names the network devices were given THIS TIME!
We'll use Linux Mint 17 Cinnamon edition for our examples. Most of this applies, sometimes with slight modifications, for most Linux distributions.
10 Things To Do After Installing Linux Mint 17 LTS
Apply the updates.
Before you do anything else, look in the panel for the icon that indicates that updates are available. Click the icon and install the updates. In the unlikely event that you are asked to reboot, do it before you go any further.
Check the device drivers
Mint does a fabulous job of detecting devices and using the right drivers. Linux drivers are generally in the Kernel and don’t have to be installed separately. On rare occasions, things don’t go according to plan and need a little adjusting.
Choose "System Settings" from the main menu and click "Device Drivers."
If the open source driver doesn't work as you think it should, and there is a proprietary driver available, then choose the proprietary driver and apply the changes.
The latest version of Ubuntu and derivatives (like Mint) may have an issue with Broadcom cards not being recognized correctly and the appropriate drivers not being installed. This forum post details a fix for getting a stubborn Broadcom card working: http://forums.linuxmint.com/viewtopic.php?f=49&t=169434&p=870973&hilit=broadcom#p870973)
Install your Applets, Extensions and assistive technology (Accessibility).
You'll find selections for each of these under "System Settings". Which ones you like are all up to you. Try them. You can easily inactivate them if you don't like them.
Personalize the trackpad and mouse settings.
Choose “System Settings” from the main menu and click the “Mouse and Touchpad” icon.
Make changes so that the mouse and touchpad work they way you want.
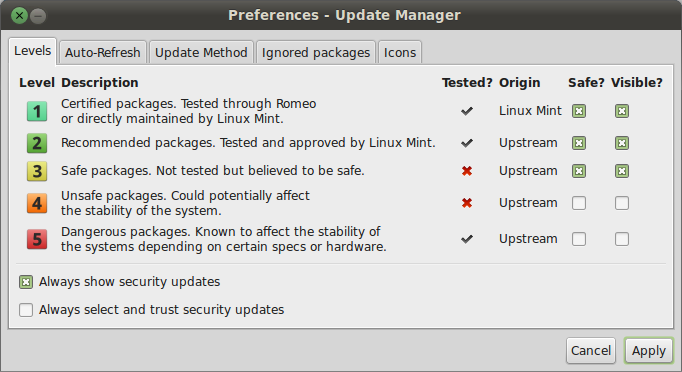
Personalize the Update Manager.
The update manager in Mint 17 has seen some improvements. It provides more control.

Levels tab: Clearly identifies what’s risky and what’s safe.
Ignored packages tab: If you have installed an older version of an app, this is where you tell Mint never to look for, or install updates. (E.g. You may need to use an older version of Skype.)
Personalize the file manager.
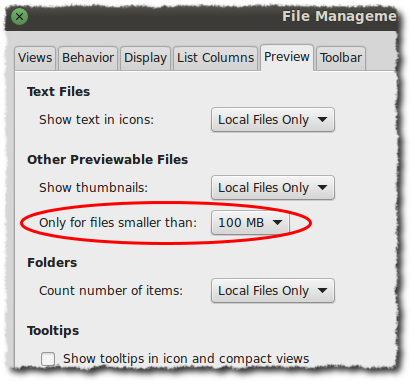
Some new features have been added to the Nemo file manager. For example, you can now select a size threshold for showing previews of various kinds of files. For people, like podcasters, who (pre)view video and audio files in the file manager, the new default settings are too low. Open the file manager and select "Preferences" from the "Edit" menu. Choose the "Preview" tab.

If you want to see the preview icon for files larger than the default, there are plenty of settings to choose from.
Copy all of your home directory files from your backup.
Remember the hidden folders. That’s where all the settings are stored for your installed applications. Doing this before you install additional applications will save you some time.
Now you can install your favorite applications.
In episode 245 we detail how to use dpkg to backup and restore installed apps: http://goinglinux.com/shownotes.html#glp245
Optimize.
If you have an SSD drive, use our tips for optimizing Linux for use with your SSD. See our article, "Optimize for SSD" for details.
Tweak everything.
Finally, install your favorite theme and make all your other personalization tweaks. Here I my theme-related tweaks:
- Theme: Linux Mint
- Controls: Mint-X
- Icons: elementary
- Window borders: 05-Crunchy-green
- Mouse Pointer: DMZ-White
- Background: Going Linux Podcast custom wallpaper

